 Hello everyone! My name is Chris Brower, and I’m the Lead Architect at ByDesign. I’ve been leading up development of our new phone app for the past year, and I’d like to share some of our decisions and development we’ve work to deliver a great app experience. One of the most exciting changes in the new app is that each client will have their own branded version of the app. Also, the new app will be branded the same as Revolution and use the same configuration as Revolution, meaning all menus and setup within Revolution will be immediately available within the phone app. The new app has many other features we’re excited about such as over-the-air updates and native tokenized authentication storage (only log in when needed just like Facebook). However, today we’re going to review another exciting feature available in the new app: push notifications.
What is a push notification? A push notification is a notification (alert) on a phone that was pushed to the phone versus being pulled. The difference between a pushed notification and a pulled notification is that pulled notifications are something that’s happening where the app “wakes up” every so often, makes a request to a server to see if there are any recent updates, and then goes back to sleep. This is very costly to a phone’s battery. Push notifications are something where Google or Apple “pushes” a notification directly to a device, just like when a carrier tells the phone it’s getting a call. This means that nothing is running in the background (except for the native phone operating system), yet the push notifications will still be received. Push notifications are preferred as they have almost zero impact on battery life versus pulled notifications.
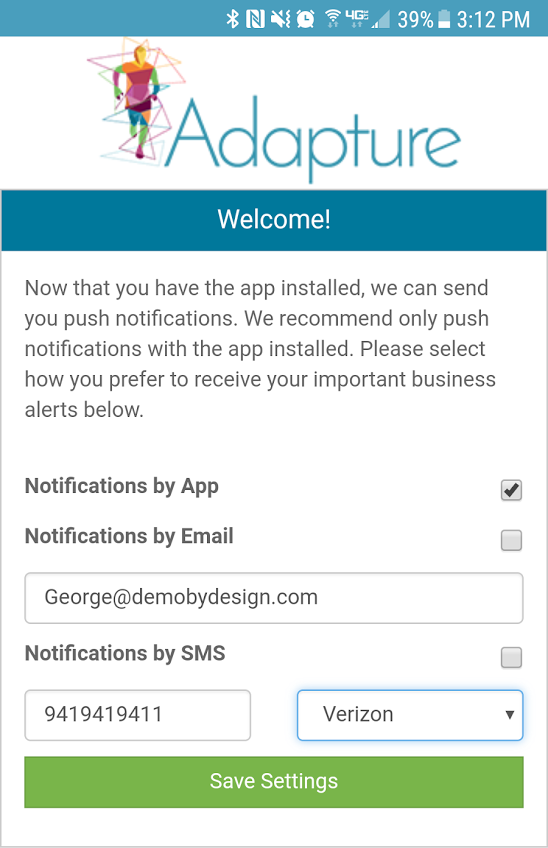
Now, in order to get push notifications to a phone, there is a handshake that needs to happen between the phone, our servers, and Apple/Google’s delivery systems. When first logging into the app, a screen like the following is shown:
This screen lets a user choose how to receive notifications. By default, we’ll enable push notifications (Notifications by App) versus text or email, but the user is welcome to disable/enable whatever they’d like. Once settings are saved, the underlying work begins. First, we’ll make sure we have permission to send push notifications to the device. Depending on iOS or Android, a pop-up will request permission to send push notifications. Once we have permission, the device will send a request to Apple/Google to get a registration token. This registration token is both a license to send push notifications to the device as well as something that identifies the device. We’ll then send a request to our servers to store this registration token. Every time the app is opened, this handshake has to happen to make sure that the registration token is valid as well as making sure we still have permission to send push notifications.
Now that our servers have the registration token, we can send push notifications. So, should an alert be configured to notify when somebody new signs up, the alert would be sent directly to any configured phone allowing a user to immediately click on the notification and find out what is needed in relation to the new sign up. For instance, contact information could be found, and a congratulatory text or email could be sent moments after a signup!
We hope this information helps you understand the inner working that needs to happen in the background to get a notification to a device in the most efficient way possible. We’re excited about how alerts and push notifications together could greatly simplify quick and simple communication among our users, and we hope that you are excited about it as well.